Keystone Federated Identity with Google Saml App
背景介绍
作为一个私有云平台,能够和其他账户中心打通,使用外部平台的账户体系,这是一个非常有用的功能,尤其是作为企业中的私有云,是企业中众多平台的一部分,搞多套账户体系必定增加管理成本,能够和现有的账户体系对接,账户统一管理,是一个成熟企业的标志。OpenStack作为最流行的开源IaaS私有云平台,也是具备这种能力的,Keystone可以直接和LDAP等账户中心对接,也可以通过SAML2和OpenID Connect等协议,和外部账户中心进行联合认证,即实现类似SSO的功能。
本文档主要是来介绍下Keystone作为SP(服务提供商)通过SAML2协议跟Google的账户中心(SAML Apps)进行SSO对接的一些基本原理、配置方法以及一些关键点,关于Keystone的联合认证,网上已经有大量的资料可以参考:
- https://docs.openstack.org/security-guide/identity/federated-keystone.html
- http://wsfdl.com/openstack/2016/01/14/Keystone-Federation-Identity-with-SAML2.html
- https://docs.openstack.org/keystone/pike/advanced-topics/federation/federated_identity.html#keystone-as-an-identity-provider-idp
- https://docs.openstack.org/keystone/latest/admin/federation/introduction.html
Keystone很早就开始支持联合认证,到现在发展已经比较成熟了,目前支持两种联合认证方式:
- SAML:Security Assertion Markup Language
- OpenID Connect
SAML是一种基于XML的认证技术,OpenID Connect则使用JSON/REST,更加简单易用;SAML只支持Web应用,而OpenID Connect还支持移动应用。关于SAML和OpenID Connect可以参考下面两篇文档:
- https://www.cnblogs.com/shuidao/p/3463947.html
- https://developers.google.com/identity/protocols/OpenIDConnect
本文档主要是测试Keystone作为SP使用SMAL2协议跟Google的SAML Apps进行WebSSO对接,Google SAML Apps是谷歌的G-Suite里面提供的一个支持SAML协议的IDP服务,G-Suite还提供用户目录,里面有用户和组的管理,SAML Apps就是通过SAML协议可以将用户目录暴露出去,让第三方应用过来对接,所以,最终达到的效果就是从Horizon的登录界面,跳转到Google的账户中心进行登录,然后跳转回Horizon,登录到面板中。需要注意的是,本次测试只是测试Web SSO,即基于浏览器的单点登录,其实Keystone还支持不通过浏览器的SSO,即直接可以通过API从IDP那里认证,然后拿到SP端的Keystone Token,这部分内容不在我们本次的测试范围内,因此配置上跟官方文档上的一些配置有些出入。
基本原理
Keystone早期只支持作为SP,后来也增加了作为IDP的支持,作为SP,Kesytone没有自己去开发相关的功能,而是依赖于第三方工具以及对应的Apache HTTPD中的模块,比如针对SAML协议的SSO,使用的是Shibboleth以及对应的Apache模块mod_shib,他们可以作为Keystone和IDP的一个中间件,解析SAML请求,处理SSO的逻辑,而Keystone本身以扩展的形式实现了Federation API,可以增删查改SP和IDP,可以定义某个IDP中的用户和本地的用户如何映射的mapping规则,因为Keystone并不是Web前端,所以还需要Horizon来处理部分WebSSO的逻辑,整体的流程如下图所示:
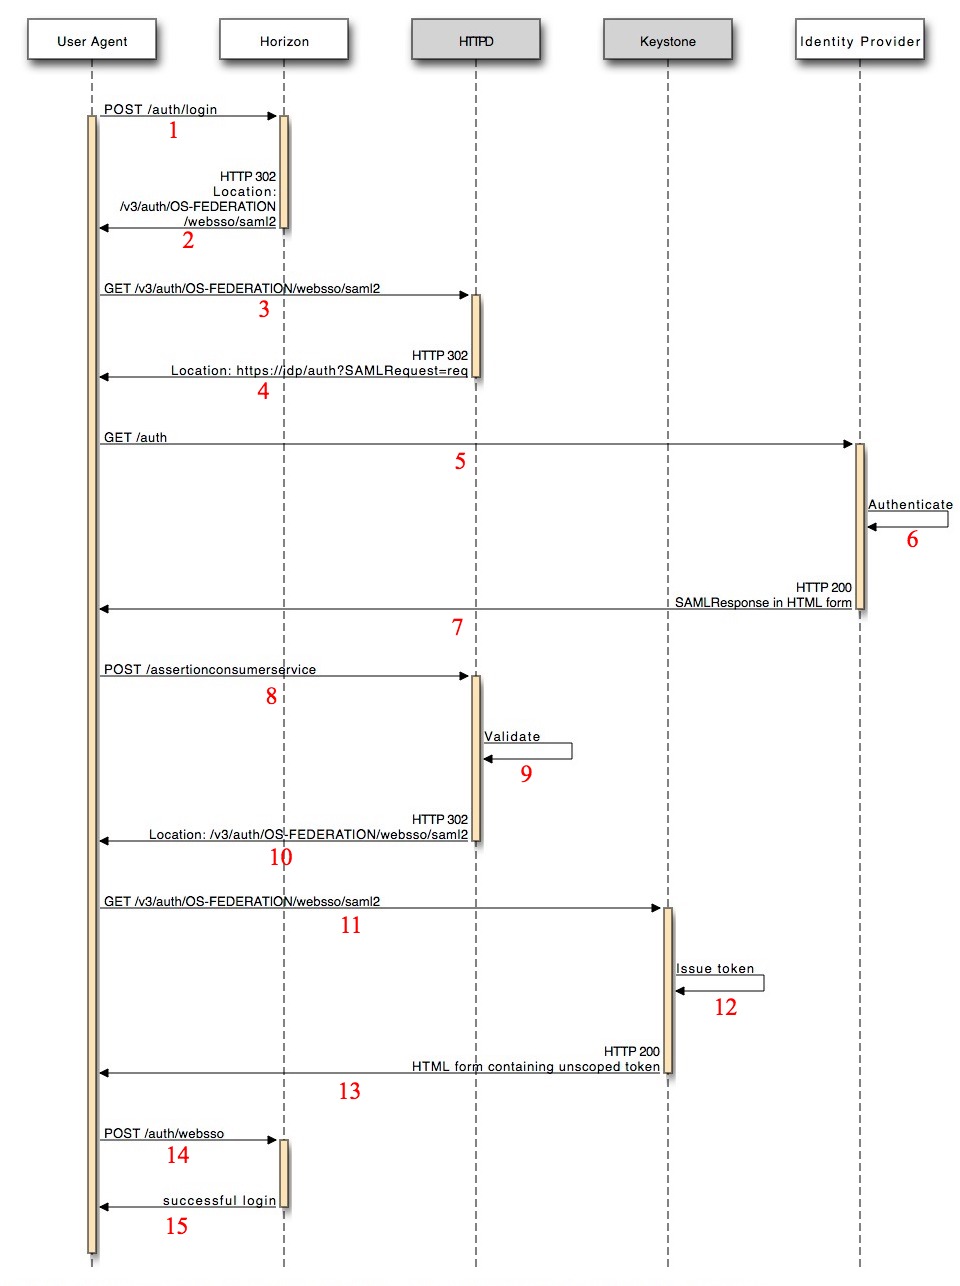
步骤1,2 浏览器重定向到
/v3/auth/OS-FEDERATION/websso/saml2,这个地址是websso的特定地址,它被配置到httpd的vhost中,作为特殊路径被shibboleth处理;步骤3,4,httpd接受到请求之后,拦截到该特殊路径,会将该请求交给shibboleth去处理,shibboleth是有一个独立进程的,它可以处理SAML相关的请求,在这一步,它会将SP端的信息,以SAML协议的XML格式,经过私钥加密,发送给IDP端,内容叫做AuthnRequest,如下所示:
1
2
3
4
5
<?xml version="1.0" ?>
<samlp:AuthnRequest AssertionConsumerServiceURL="https://sp.ustack.com:15000/Shibboleth.sso/SAML2/POST" Destination="https://accounts.google.com/o/saml2/idp?idpid=C03vf5z0r" ID="_b4a92cde99677bb242fcd35241cf37a5" IssueInstant="2019-05-25T15:35:53Z" ProtocolBinding="urn:oasis:names:tc:SAML:2.0:bindings:HTTP-POST" Version="2.0" xmlns:samlp="urn:oasis:names:tc:SAML:2.0:protocol">
<saml:Issuer xmlns:saml="urn:oasis:names:tc:SAML:2.0:assertion">https://sp.ustack.com:15000/Shibboleth.sso</saml:Issuer>
<samlp:NameIDPolicy AllowCreate="1"/>
</samlp:AuthnRequest>这里面有三个比较重要的SP端信息:
AssertionConsumerServiceURL:简称ACS,如名字所表达的意思,是在IDP端认证完成之后,IDP端需要向SP端发送响应,该属性指定了SP端处理来响应的地址,该地址是真实有效的,是由Shibboleth提供的,因为Google要求ACS地址必须是https的,所以在SP这端必须配置上https;
ProtocolBinding:SP端是可以提供多种协议的ACS的,每种协议都有对应的称之为Binding的路径来处理,比如常见的HTTP POST,HTTP Redirect,此处,使用的就是HTTP POST,即IDP端处理完请求,往SP端发送响应时,是通过向SP端的ACS URL发送POST请求来完成的;
Issuer:SP端的Entity ID,即SP端的唯一标志符,通常用URL表示,这个在SP和IDP端一定要保持一致。
以上SP端的SAML XML格式的信息,会被Shibboleth经过IDP端提供的X509的证书进行加密,然后放到SAMLRequest参数中,以Query String的形式,重定向到IDP。至于SP端是怎么知道IDP在哪里,以及IDP的证书是如何提供的,则是通过IDP提供的一个Metadata地址或者文件,配置在SP的Shibboleth里面的,下面的示例会介绍到。
步骤5,6,7则是在步骤4重定向到IDP之后,带着SamlRequest,进入到了IDP的处理逻辑,此处在IDP做的事情,无疑就是输入用户名和密码,进行登录认证,认证完成之后,将IDP端经过认证的用户的信息,封装成SAML XML格式的信息,即SamlResponse,通过SamlRequest中指定的SP端的回调信息,将返回值传输回SP,在本例中,使用的是HTTP POST,将SamlResponse经过加密,放到POST的body中,向SP端的ACS URL发送POST请求,此处的重点是SamlResponse,它是一个XML格式的信息,里面就包含了SAML的精髓,即Assertion,在本例中,其SamlResponse如下:
1
2
3
4
5
6
7
8
9
10
11
12
13
14
15
16
17
18
19
20
21
22
23
24
25
26
27
28
29
30
31
32
33
34
35
36
37
38
39
40
41
42
43
44
45
46
47
48
49
50
51
52
53
54
<?xml version="1.0" ?>
<saml2p:Response Destination="https://sp.ustack.com:15000/Shibboleth.sso/SAML2/POST" ID="_95d7aed5878b2ff466a79a1d2661ae5e" InResponseTo="_4d4f20f39a145d412c1
854236e5ea5e1" IssueInstant="2019-05-14T13:48:34.590Z" Version="2.0" xmlns:saml2p="urn:oasis:names:tc:SAML:2.0:protocol">
<saml2:Issuer xmlns:saml2="urn:oasis:names:tc:SAML:2.0:assertion">https://accounts.google.com/o/saml2?idpid=C03vf5z0r</saml2:Issuer>
<saml2p:Status>
<saml2p:StatusCode Value="urn:oasis:names:tc:SAML:2.0:status:Success"/>
</saml2p:Status>
<saml2:Assertion ID="_c463b606831db5bbd08b53ebd6988acc" IssueInstant="2019-05-14T13:48:34.590Z" Version="2.0" xmlns:saml2="urn:oasis:names:tc:SAML:2.0
:assertion">
<saml2:Issuer>https://accounts.google.com/o/saml2?idpid=C03vf5z0r</saml2:Issuer>
<ds:Signature xmlns:ds="http://www.w3.org/2000/09/xmldsig#">
<ds:SignedInfo>
<ds:CanonicalizationMethod Algorithm="http://www.w3.org/2001/10/xml-exc-c14n#"/>
<ds:SignatureMethod Algorithm="http://www.w3.org/2001/04/xmldsig-more#rsa-sha256"/>
<ds:Reference URI="#_c463b606831db5bbd08b53ebd6988acc">
<ds:Transforms>
<ds:Transform Algorithm="http://www.w3.org/2000/09/xmldsig#enveloped-signature"/>
<ds:Transform Algorithm="http://www.w3.org/2001/10/xml-exc-c14n#"/>
</ds:Transforms>
<ds:DigestMethod Algorithm="http://www.w3.org/2001/04/xmlenc#sha256"/>
<ds:DigestValue>zE5x7BttL/P14aGZ9dicTvMXc9/gspW9icb3Yp2wU6w=</ds:DigestValue>
</ds:Reference>
</ds:SignedInfo>
<ds:SignatureValue>My7ENgwJbo0mG+NxyCFYqYcQWZfqHURnioOfeY2JCTZCmaNUIZFmZHTBSnt23kF9b8COt9CZiD6WQr6z4uFFoFbAn8RPTk5Z2dUQc1koZbEbFftQlA$=</ds:SignatureValue>
<ds:KeyInfo>
<ds:X509Data>
<ds:X509SubjectName>ST=California,C=US,OU=Google For Work,CN=Google,L=Mountain View,O=Google Inc.</ds:X509SubjectName>
<ds:X509Certificate>MIIDdDCCAlygAwIBAgIGAWqyN85bMA0GCSqGSIb3DQEBCwUAMHsxFDASBgNVBAoTC0dvb2dsZSBJZPEdDSRaXHwUYY8N2S/ch$BDyRQsE0z/eYOFdnk+fGox</ds:X509Certificate>
</ds:X509Data>
</ds:KeyInfo>
</ds:Signature>
<saml2:Subject>
<saml2:NameID Format="urn:oasis:names:tc:SAML:1.1:nameid-format:unspecified">suo@hackerain.github.io</saml2:NameID>
<saml2:SubjectConfirmation Method="urn:oasis:names:tc:SAML:2.0:cm:bearer">
<saml2:SubjectConfirmationData InResponseTo="_4d4f20f39a145d412c1854236e5ea5e1" NotOnOrAfter="2019-05-14T13:53:34.590Z" Recip$ent="https://sp.ustack.com:15000/Shibboleth.sso/SAML2/POST"/>
</saml2:SubjectConfirmation>
</saml2:Subject>
<saml2:Conditions NotBefore="2019-05-14T13:43:34.590Z" NotOnOrAfter="2019-05-14T13:53:34.590Z">
<saml2:AudienceRestriction>
<saml2:Audience>https://sp.ustack.com:15000/Shibboleth.sso</saml2:Audience>
</saml2:AudienceRestriction>
</saml2:Conditions>
<saml2:AttributeStatement>
<saml2:Attribute Name="openstack_user">
<saml2:AttributeValue xmlns:xs="http://www.w3.org/2001/XMLSchema" xmlns:xsi="http://www.w3.org/2001/XMLSchema-instance" xsi:type="xs:anyType">Guangyu</saml2:AttributeValue>
</saml2:Attribute>
</saml2:AttributeStatement>
<saml2:AuthnStatement AuthnInstant="2019-05-14T13:29:24.000Z" SessionIndex="_c463b606831db5bbd08b53ebd6988acc">
<saml2:AuthnContext>
<saml2:AuthnContextClassRef>urn:oasis:names:tc:SAML:2.0:ac:classes:unspecified</saml2:AuthnContextClassRef>
</saml2:AuthnContext>
</saml2:AuthnStatement>
</saml2:Assertion>
</saml2p:Response>可见SamlResponse包含了非常多的信息,重点是Assertion中包含的信息,有签名信息,证书信息,以及一些IDP端关于用户的一些属性,比如例子中的AttributeStatement中所包含的属性:openstack_user,它映射的值,就是IDP里面存储的用户名:Guangyu
步骤8,9,10则是在SP HTTPD接受到IDP发来的响应之后,进行的一些处理逻辑。做的事情就是解析SamlResponse,检查返回值的合法性,然后提取里面用户的属性,将用户属性以Session的形式保存起来,然后再重定向到
/v3/auth/OS-FEDERATION/websso/saml2,这里最重要的是将用户的信息以Session形式保存下来,默认是保存到Shibboleth进程的内存中的,有了Session其实就意味着用户”登录“成功了,在Shibboleth中,可以通过浏览器访问https://host:port/Shibboleth.sso/Session路径来查看保存的Session,如本例中,浏览器访问https://sp.ustack.com:15000/Shibboleth.sso/Session会看到如下的信息:1
2
3
4
5
6
7
8
9
10
11Miscellaneous
Session Expiration (barring inactivity): 437 minute(s)
Client Address: 10.0.80.71
SSO Protocol: urn:oasis:names:tc:SAML:2.0:protocol
Identity Provider: https://accounts.google.com/o/saml2?idpid=C03vf5z0r
Authentication Time: 2019-05-24T02:30:07.000Z
Authentication Context Class: urn:oasis:names:tc:SAML:2.0:ac:classes:unspecified
Authentication Context Decl: (none)
Attributes
openstack_user: Guangyu在第10步中,Shibbloleth处理完POST请求,会再次重定向到
/v3/auth/OS-FEDERATION/websso/saml2,我们知道,在之前的第2步中,也向这个地址重定向过,并且被Shibboleth拦截,从而跳向了IDP进行认证,那么这里的再次重定向,跟之前那次有什么不一样呢?最主要的区别,是针对该浏览器,服务器端已经保存了用户的Session信息,重定向时,浏览器是带着cookie来访问该地址的,cookie中保存了sessionid,服务端查看该sessionid在服务端已经保存,并且没有过期,那么它就认为其是一个合法用户,不会对其进行拦截,从而让其走正常的流程,可以看看Apache Httpd Keystone Vhost中的这段配置:1
2
3
4
5
6
7
8<Location ~ "/v3/auth/OS-FEDERATION/websso/saml2">
AuthType shibboleth
Require valid-user
ShibRequestSetting requireSession 1
ShibRequireSession On
ShibExportAssertion Off
LogLevel debug
</Location>针对该路径,认证方式是shibboleth,而原语
Require valid-user意思是要求是一个合法用户,才可以访问该路径,如果不合法,则需要向Shibboleth请求一个Session,从而走向了我们之前说的逻辑,而一旦获取到了Session,则成为一个valid user,下次再访问这个用户,就可以正常访问这个路径了,并且在访问这个路径时,Session信息,会以环境变量的形式,传递到该路径对应的API接口中。因此步骤11,12,13其实是正常的访问Keystone的请求,而
/v3/auth/OS-FEDERATION/websso/saml2则是Keystone实现的一个API,即 GET /v3/auth/OS-FEDERATION/websso/{protocol_id}?origin=https%3A//horizon.example.com,它做的事情,就是根据protocol_id,找到配置在keystone配置文件中对应protocol的RemoteID属性名,RemoteID其实就是IDP的Entity ID,IDP的信息是提前通过API录入到Keystone的数据库中的,根据RemoteID的属性名,就可以由Session传入的环境变量中找到对应的RemoteID:1
2
3
4
5
6
7
8
9
10
11
12
13
14
15
16
17
18
19
20
21
22
23
24
25
26在keystone.conf中有如下配置:
[saml2]
remote_id_attribute = Shib-Identity-Provider
在Shibboleth的Session中有如下属性:
Identity Provider: https://accounts.google.com/o/saml2?idpid=C03vf5z0r
该属性会变成环境变量传给该接口,属性的名字就变成了:
Shib-Identity-Provider: https://accounts.google.com/o/saml2?idpid=C03vf5z0r
而在Keystone中已经提前录入了IDP的信息:
[root@mon01 ~]# openstack identity provider show google-idp
+-------------+-----------------------------------------------------+
| Field | Value |
+-------------+-----------------------------------------------------+
| description | None |
| domain_id | 7c1efdfe963045d19635330e27a4608d |
| enabled | True |
| id | google-idp |
| remote_ids | https://accounts.google.com/o/saml2?idpid=C03vf5z0r |
+-------------+-----------------------------------------------------+根据以上关系,可以通过RemoteID找到对应的IDP,然后根据request中的环境变量信息,以及idp_id和protocol_id,就可以获取到一个unscoped的token,而获取这个token的过程,其实就是进入到了Keystone处理Federation认证最核心的逻辑:**
Mapping**,即Keystone事先定义好了一组Remote User和Local User的一个Mapping规则,Remote User说的就是IDP中的用户信息,它保存在本次请求的环境变量中,而Local User就是在SP端的Keystone用户信息,Mapping规则,就是定义了Remote User的什么属性映射成Local User的什么属性,Keystone会对应的在数据库中创建Local User。Keystone Federation认证的成熟主要体现在Mapping规则的成熟,目前实现的Mapping规则还是非常强大的,几乎可以完成任何你想要的定制,Mapping规则的格式如下:1
2
3
4
5
6
7
8
9
10
11
12
13
14
15
16
17
18
19{
"rules": [
{
"local": [
{
<user>
[<group>]
[<project>]
}
],
"remote": [
{
<match>
[<condition>]
}
]
}
]
}通过命令行创建一个mapping:
1
$ openstack mapping create --rules rules.json google-idp-mapping
根据mapping规则,创建好Local User,然后会获取到一个unscoped的token,该token被放到一个
sso_callback_template.html表单中,重定向到origin指定的地址,而该origin指定的地址就是Horizon来处理websso登录的地址,即:/auth/websso/。步骤14,15即是Horizon的处理逻辑了,浏览器带着unscoped token,访问Horizon的
/auth/websso路径,Horizon会用unscoped token再去请求该token所代表用户的Project信息,如果有跟该用户关联的project,则会再去请求一个scoped token,然后再经过一次重定向,登录到Horizon面板中。
可以看到整个WebSSO的流程还是很复杂的,但是重点有两方面:
- 一个重点是Shibboleth的处理流程,以及配置方法,Shibboleth很强大,不仅可以作为SP,还可以作为IDP,它是OpenSAML协议的一个实现,有C++和Java两个版本,其具有非常复杂的配置项,官方文档地址在 Service Provider 3,理解Shibboleth的概念以及配置项是关键;
- 另外一个重点就是Keystone里面的 Federation API,作为SP,它要在自己的数据库中记录IDP的信息,以及相应的Protocol, Mapping等,Mapping规则很强大,可以使用正则对Remote进行匹配,映射到的Local可以关联到user, group以及project上,甚至可以自动创建project,将该user和该project进行关联,让该user直接获取到scoped token,关于Mapping的更详细使用方法,见官方文档:Mapping
测试步骤
环境准备
- OpenStack环境,Rocky版本
- 申请一个G-Suite账号,地址在:https://admin.google.com
- 域名和有效证书,因为Google作为IDP端是需要回调SP的接口的,都是走的互联网,Google要求必须是https的接口
配置Google SAML App
登录G-Suite,在Apps->SAML Apps中,新建Saml App,选择自定义App,一个Saml App就代表着一个SAML的IDP,其中有几步操作是重点:
1. 获取IDP的Metadata文件
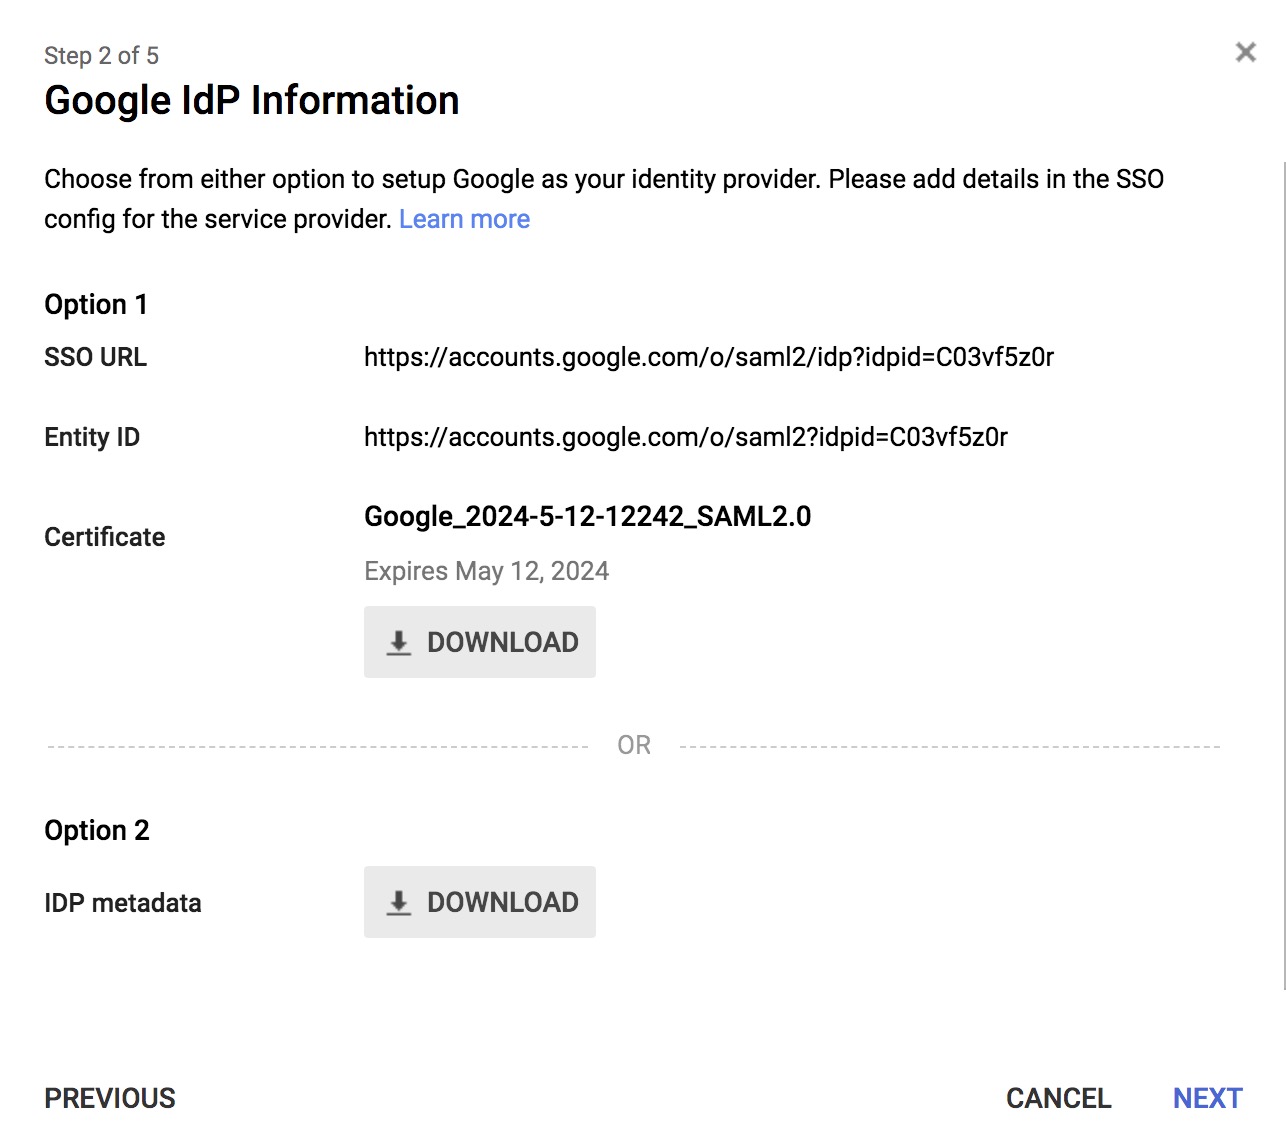
下载Option 2中的IDP metadata文件,这个文件会在配置SP端时用到,里面包含了IDP的信息,该文件名字是GoogleIDPMetadata-xxx.xxx.xml。同时也要注意Option 1中的两个信息,分别为IDP的SSO URL,以及IDP的Entity ID,SSO URL即为SP重定向要的地址。
2. 填写SP端的信息
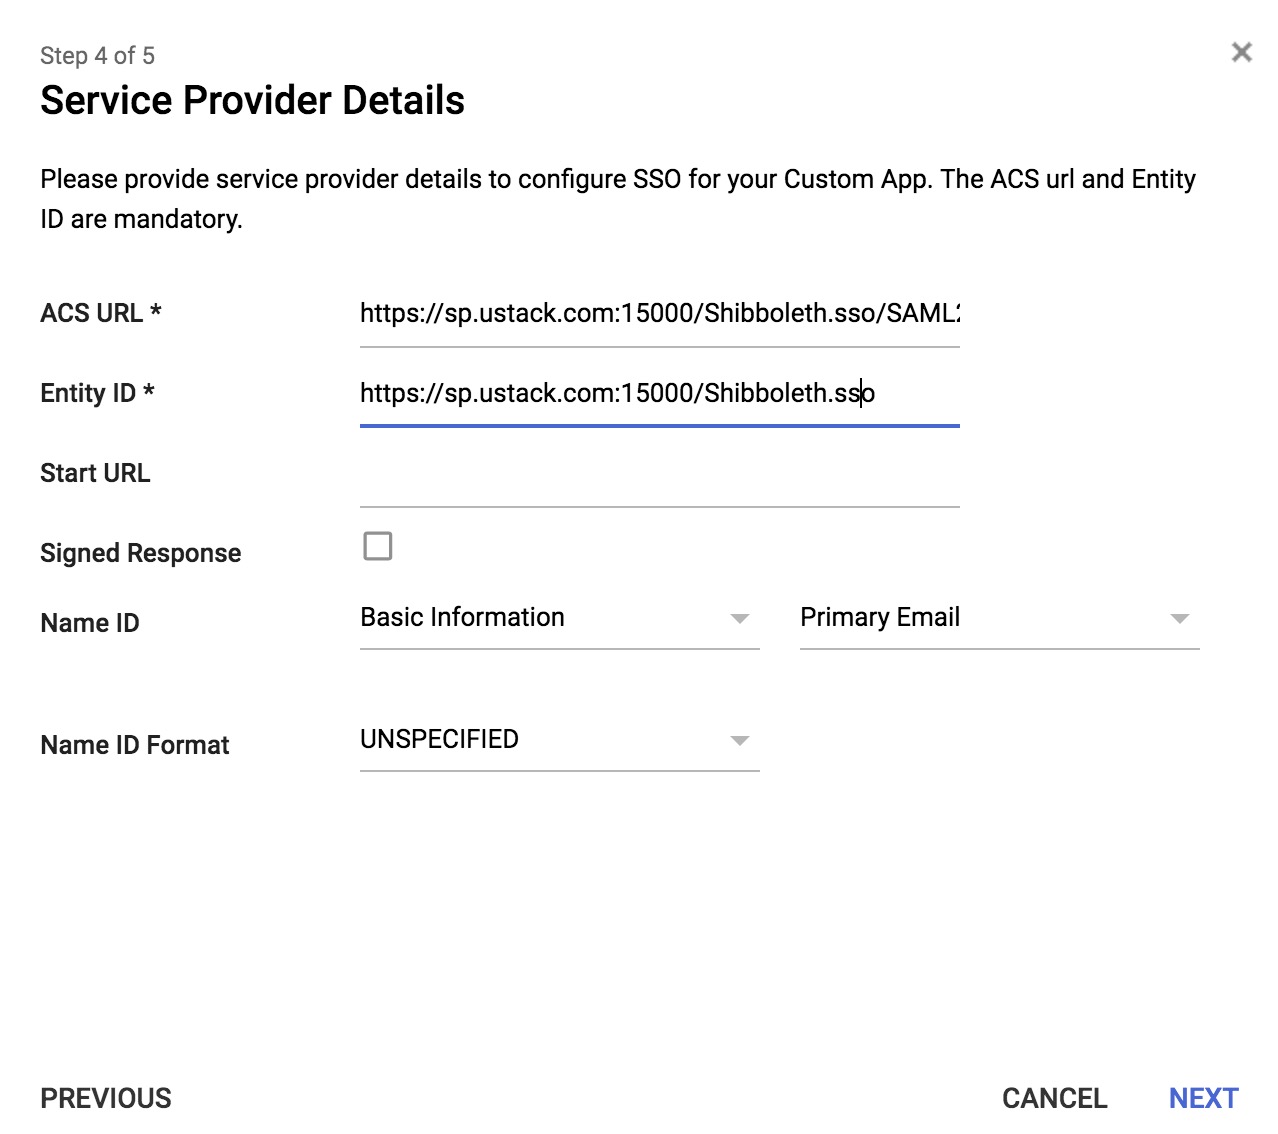
在IDP端要输入SP端的两个必填信息,一个是SP端的ACS URL,如上面原理中所介绍,该URL是SP端提供的用来处理IDP认证通过后,接受回调的接口,这里必须配置成https,因为SP端需要有有效证书,以及配置域名。本例中,ACS URL是:https://sp.ustack.com:15000/Shibboleth.sso/SAML2/POST,另一个必填信息是SP端的Entity ID,这个值没有特殊要求,但是需要和SP端配置的Entity ID保持一致,否则会SP端会匹配不到对应的ACS地址来处理IDP的回调请求。
3. 配置属性Mapping
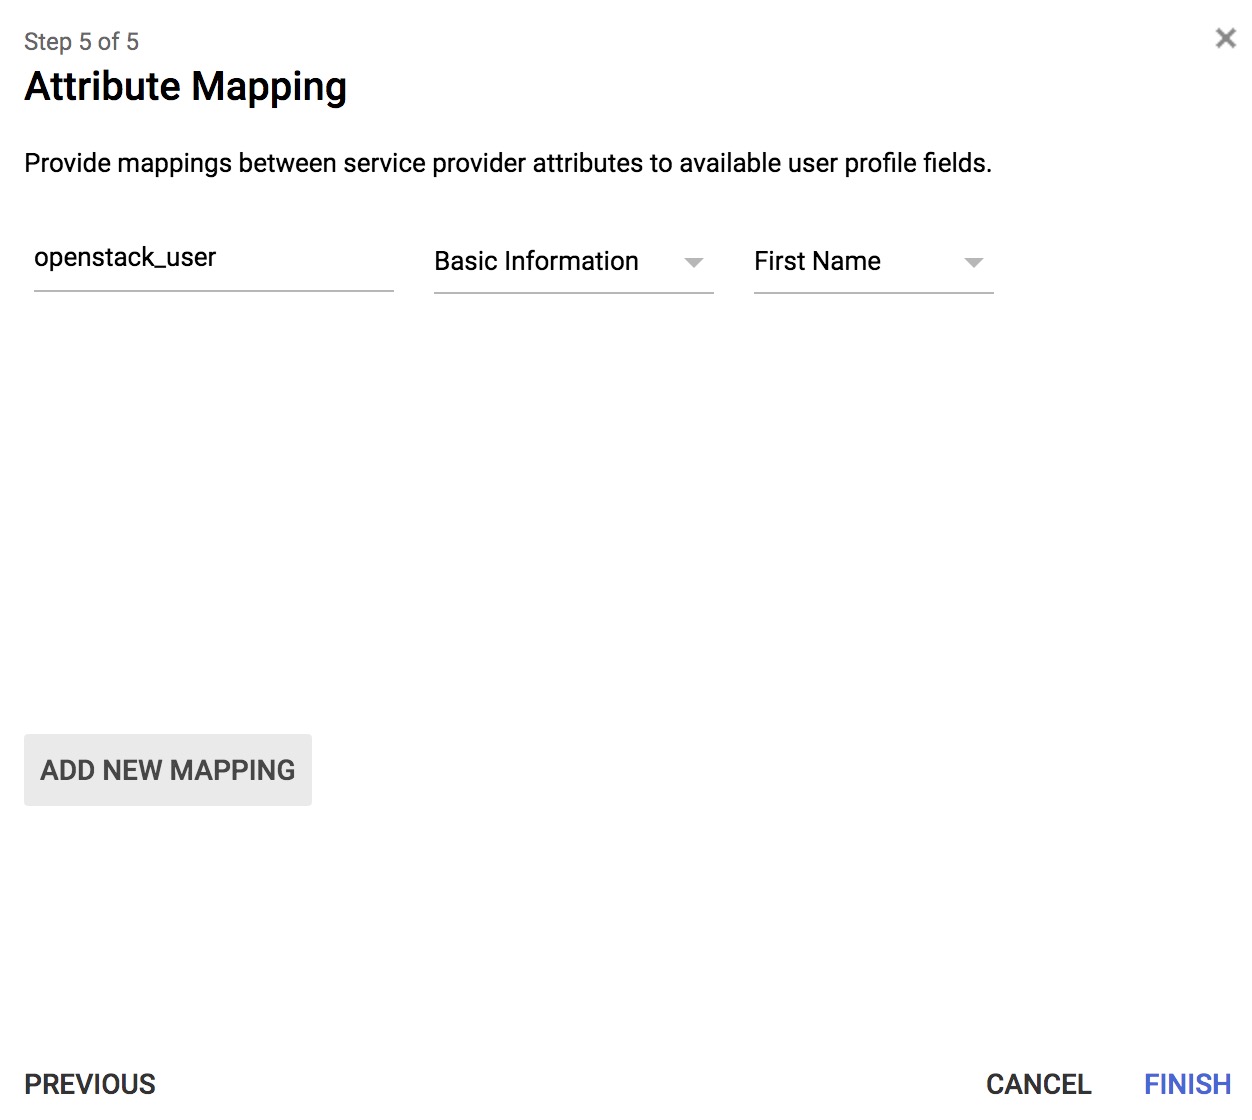
这个Mapping的意思就是要将IDP端的哪些属性暴露给SP,可选的有很多,G-Suite有一个用户目录,可以管理用户和组,里面有很多属性。最左边的属性名是SP端支持的属性,右边两个下拉框是IDP端可以提供哪些属性,如本例中,SP端支持openstack_user这个属性,它map的IDP的属性则是First Name。
配置Keystone作为SP
1. 配置Keystone运行在Apache上
如上所述,因为Federation依赖Apache的模块,所以Keystone需要以wsgi的方式运行在Apache中,具体配置这里不再描述,参考官方配置文档,一般现在OpenStack自动化工具都支持这种部署方式。
2. 安装配置Shibboleth
这一步比较重要,需要安装shibboleth,不过因为官方文档上介绍的都是使用ubuntu系统,我们OpenStack使用的系统是CentOS 7,所以配置和官方文档上的步骤略有不同。
2.1 配置shibboleth的yum源
1 | vim /etc/yum.repos.d/shibboleth.repo |
2.2 安装shibboleth
1 | yum install shibboleth |
安装完shibboleth,mod_shib模块就自动加载好了,可以通过如下命令查看:
1 | [root@keystone ~]# httpd -M | grep shib |
2.3 编辑shibboleth2.xml文件
/etc/shibboleth/shibboleth2.xml 是shibboleth的主要配置文件,最简单的配置内容如下:
1 | <SPConfig xmlns="urn:mace:shibboleth:2.0:native:sp:config" |
其中有几个信息是比较重要的,在前面的原理部分也进行过讲解:
ApplicationDefaults中的
entityID属性即为SP端的Entity ID,需要和IDP里面配置的SP Entity ID保持一致。Session表示Shibboleth对一个Session的处理逻辑,都在这个里面定义
SSO,是处理SSO的核心逻辑,它里面定义了当有请求过来时,由谁如何进行处理的逻辑,实际上,就是之前讲到的ACS,Assertion Consumer Service,其实SSO是一个简写,它等于如下的配置:
1
2
3
4
5
6
7<SessionInitiator type="SAML2" attr1="xry" attr2="abc"/>
<md:AssertionConsumerService Binding="urn:oasis:names:tc:SAML:2.0:bindings:HTTP-POST" Location="/SAML2/POST" />
<md:AssertionConsumerService Binding="urn:oasis:names:tc:SAML:2.0:bindings:HTTP-POST-SimpleSign" Location="/SAML2/POST-SimpleSign" />
<md:AssertionConsumerService Binding="urn:oasis:names:tc:SAML:2.0:bindings:HTTP-Artifact" Location="/SAML2/Artifact" />
<md:AssertionConsumerService Binding="urn:oasis:names:tc:SAML:2.0:bindings:PAOS" Location="/SAML2/ECP" />
<md:ArtifactResolutionService Binding="urn:oasis:names:tc:SAML:2.0:bindings:SOAP" Location="/Artifact/SOAP" />即SSO中定义了多个ACS,每种ACS都支持一种特定的协议来接受请求,来处理SSO的逻辑,比如本例中使用的就是 HTTP POST协议,在Google IDP中,配置的也是这个ACS的地址,也即Location属性所指定的内容。
SSO不仅支持SAML2,还支持SAML1,一般都会写到SSO的值里面,此外entityID需要填写上IDP的Entity ID,即当有某个IDP的请求过来时,由哪个SSO进行处理,Shibboleth也是支持多个IDP的。
MetadataProvider,指定了IDP的metadata信息,可以直接指定一个本地文件,也可以是网络文件,本例中直接指定的是本地文件,即在前面从Google下载下来的GoogleIDPMetadata-xxx.xxx.xml,内容如下:
1
2
3
4
5
6
7
8
9
10
11
12
13
14
15<?xml version="1.0" encoding="UTF-8" standalone="no"?>
<md:EntityDescriptor xmlns:md="urn:oasis:names:tc:SAML:2.0:metadata" entityID="https://accounts.google.com/o/saml2?idpid=C03vf5z0r" validUntil="2024-05-11T17:22:42.000Z">
<md:IDPSSODescriptor WantAuthnRequestsSigned="false" protocolSupportEnumeration="urn:oasis:names:tc:SAML:2.0:protocol">
<md:KeyDescriptor use="signing">
<ds:KeyInfo xmlns:ds="http://www.w3.org/2000/09/xmldsig#">
<ds:X509Data>
<ds:X509Certificate>MIIDdDCCAlygAwIBAgIGAWqyN85bMA0GCSqGSIb3DQEBCwUAMHsxFDASBgNVBAoTC0dvb2dsZSBJ</ds:X509Certificate>
</ds:X509Data>
</ds:KeyInfo>
</md:KeyDescriptor>
<md:NameIDFormat>urn:oasis:names:tc:SAML:1.1:nameid-format:emailAddress</md:NameIDFormat>
<md:SingleSignOnService Binding="urn:oasis:names:tc:SAML:2.0:bindings:HTTP-Redirect" Location="https://accounts.google.com/o/saml2/idp?idpid=C03vf5z0r"/>
<md:SingleSignOnService Binding="urn:oasis:names:tc:SAML:2.0:bindings:HTTP-POST" Location="https://accounts.google.com/o/saml2/idp?idpid=C03vf5z0r"/>
</md:IDPSSODescriptor>
</md:EntityDescriptor>可见,这里面包含了IDP的信息,有IDP的Entity ID,X509 Key,以及最重要的信息 SingleSignOnService,即IDP提供的SSO信息,当SP端重定向到IDP去进行登录验证的时候,就是重定向到这个属性所指定的地址,Google这里其实提供了两种方式,一种是重定向,一种是发送POST请求,都可以达到目的。
AttributeExtractor,它指定了一个配置文件attribute-map.xml,这里面定义了SP端支持的所有属性名,在前面设置IDP的时候,需要创建属性Mapping,配置SP的属性的时候,其依据就是来自于这个attribute-map.xml,所以,为了演示方便,我们添加几个自定义的属性到attribute-map.xml中,见2.4小节。
其他一些属性暂时不用设置,不过他们各自有各自的用途,更多内容参考Shibboleth的配置文档。
2.4 配置attribute-map.xml
打开 /etc/shibboleth/attribute-map.xml,在文件末尾添加以下内容:
1
2
3
4
5
<Attribute name="openstack_user" id="openstack_user"/>
<Attribute name="openstack_roles" id="openstack_roles"/>
<Attribute name="openstack_project" id="openstack_project"/>
<Attribute name="openstack_user_domain" id="openstack_user_domain"/>
<Attribute name="openstack_project_domain" id="openstack_project_domain"/>
其意义见上面2.3小节的AttributeExtractor的解释。
2.5 启动shibboleth
1 | $ systemctl start shibd |
3. 配置Keystone
3.1 配置wsgi-keystone.conf
1 | <VirtualHost *:5000> |
三个Location可以写在VirtualHost里面,也可以写在外面,写在外面就是全局生效,否则只在VirtualHost中生效。第一个Location是对 /v3/auth/OS-FEDERATION/websso/saml2,这个路径进行保护,详见《基本原理-第5小节》所讲述内容,拦截该请求,交由Shibboleth进行处理;第二个Location则是在有多个IDP时,会对该路径进行拦截,其他跟第一个Location一样;第三个Location,则是对请求 /Shibboleth.sso 路径的请求,全部由Shibboleth进行处理,是shibboleth的接口入口处。
至于VirtualHost中要配置 ServerName "https://sp.ustack.com" 是因为本例中的https是配置在haproxy上的,即反向代理上,后端真正的服务并没有配置https,因此在Shibboleth中构建AuthnRequest时(详细参见《基本原理-第2小节》),在拼接ACS URL时,为了让其能够拼接成https的格式,需要在VirtualHost中配置上 ServerName "https://sp.ustack.com",若在IDP里填写的ACS URL 和 AuthnRequest中生成的ACS URL 不匹配的话,会报类似的错误:
1 | 2019-05-26 21:09:18 ERROR OpenSAML.MessageDecoder.SAML2POST [2] [default]: POST targeted at (https://sp.ustack.com:15000/Shibboleth.sso/SAML2/POST), but delivered to (http://sp.ustack.com:15000/Shibboleth.sso/SAML2/POST) |
3.2 配置keystone.conf
1 | [auth] |
trusted_dashboard 这个配置项的作用是在《基本原理-第5小节》获取到unscoped token时会用到,只有当origin参数所指定的host在trusted_dashboard所指定的列表中时,keystone才会为其创建token,并且重定向回该host中,否则会认为是不可信的地址,从而拒绝该请求。
remote_id_attribute参数的作用,也请参看《基本原理-第5小节》。
4. 配置Horizon
Horizon的配置文件在:/etc/openstack-dashboard/local_settings,进行如下配置:
1 | SECURE_PROXY_SSL_HEADER = ('HTTP_X_FORWARDED_PROTO', 'https') |
SECURE_PROXY_SSL_HEADER 这个参数的配置需要注意,因为horizon也是运行在反向代理后面的,本身horizon是感知不到https配置的,但是因为生成跳转用的origin参数时,需要让其是https的,所以需要配置这个参数,让django去获取url时,能够获取成https。
WEBSSO_IDP_MAPPING的作用则是在有多个IDP时使用的,如果使用该参数的话,horizon第一跳的地址就不是 /v3/auth/OS-FEDERATION/websso/saml2了,而是 /v3/auth/OS-FEDERATION/identity_providers/{idp_id}/protocol/{protocol_id}/websso 即多了idp_id这个参数,跟3.1小节的LocationMatch匹配。
5. 在Keystone中创建Federation对象
这里Federation对象指的是IDP,Protocol,Mapping,Project,Group等对象,在整个SSO中都会用到。
5.1 创建Identity对象
1 | $ openstack domain create federated_domain |
该例子中创建了domain, project, group,并且为该group在domain和project分别赋予了Member权限的role,这样只要加到这个group的user,就可以在这个domain和project中有Member权限了。
5.2 创建Federation对象
1 | $ openstack identity provider create --remote-id https://accounts.google.com/o/saml2?idpid=C03vf5z0r google-idp |
以上创建了idp, mapping, protocol,protocol起到将mapping规则和idp连接起来的作用,即针对某种协议的Federation认证请求,某个IDP中的Remote用户应该如何映射成本地的Local用户。其中最关键还是mapping规则,本例中是将remote中的openstack_user映射成federated_domain domain中的federated_users group中的用户,用户名就是openstack_user属性对应的值,如果想要在映射的同时,为每一个用户自动创建一个project,并赋予相应的Role,那就需要用到local中的project规则了。
6. 配置过程完毕,检查效果
在登录页面选择SAML登录方式:
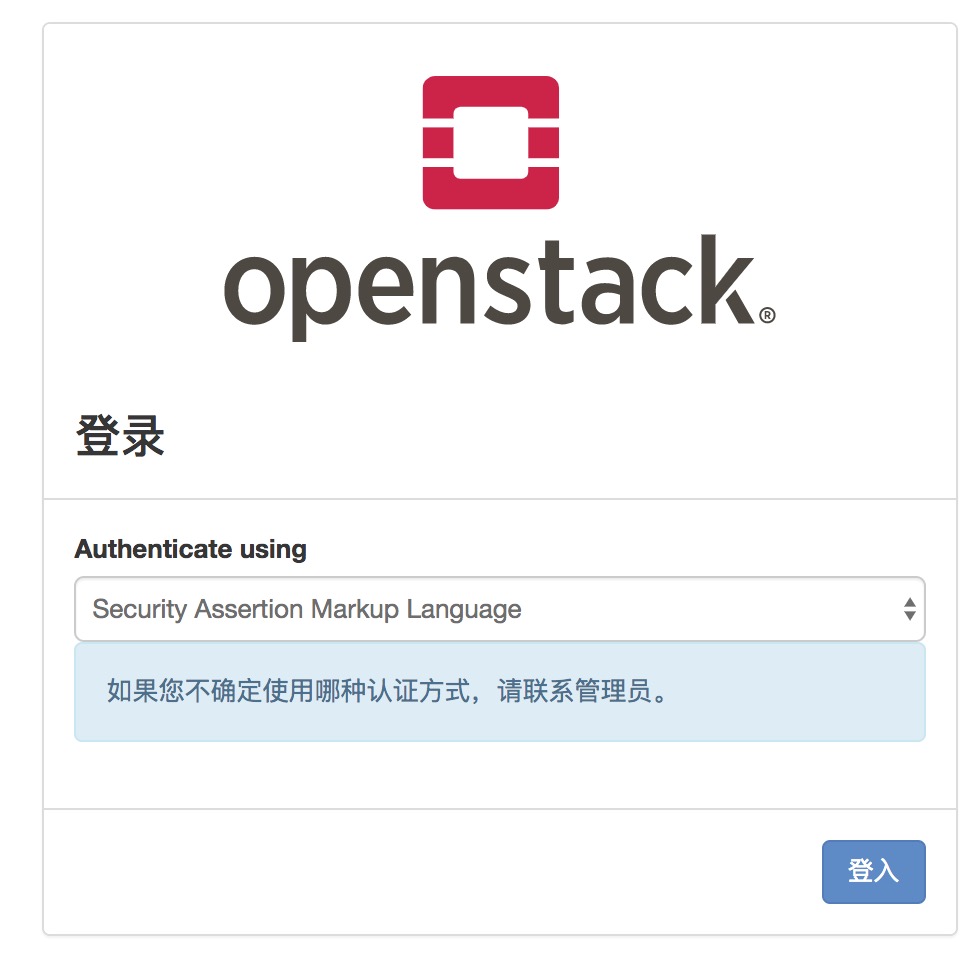
跳转到Google的登录认证页面:
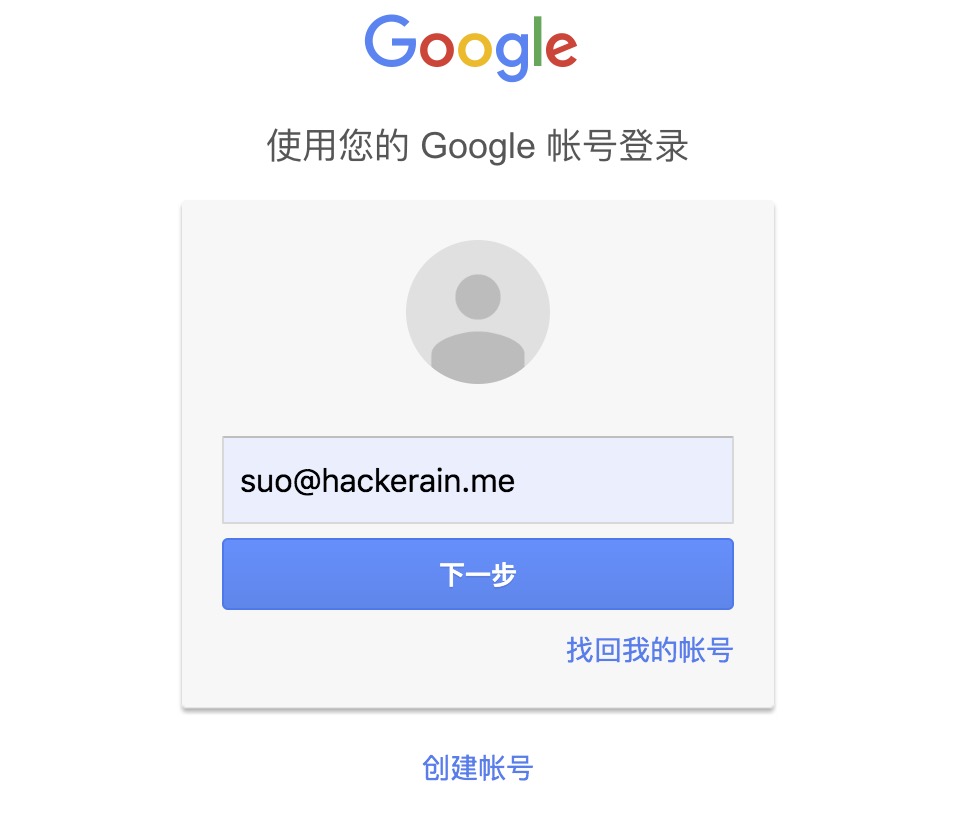
输入用户名和密码后,经过若干次跳转,登录到Horizon界面中,并且用户名是在G-Suite中创建的用户:

总结
本文档重点介绍了Keystone作为SP跟Google通过SAML协议进行对接的原理和方法,对整个流程进行了下梳理,并且对本次测试用到的配置项结合原理进行了解释,以期弄清楚这些配置项的含义,由于SSO的过程较复杂,因此解释内容较多,但是限于篇幅,并没有对一些点再进行深入,比如Shibboleth的各种配置,以及Keystone中Mapping的各种规则,这些内容以及变化较多,若要深入使用,还需要进一步研究。
通过本次测试,发现Keystone作为SP,进行Federation认证,已经比较成熟了,基本上该有的功能都有,不是一个鸡肋的功能,但是如果Keystone作为IDP的话,其实还没有实现像Google SAML App这样完备的功能,至少没有提供Web端的登录认证界面,以及对SAML请求的响应和处理,这些都是作为IDP缺少的,因此,在目前的版本中,如果想要实现IDP功能的话,还需要基于Keystone做开发,可以将Keystone作为一个IDP的后端,毕竟它有用户管理以及相应的IDP API,IDP的前端则独立开发,提供Web界面,以及对SAML请求的处理和响应。
Keystone Federated Identity with Google Saml App
https://hackerain.me/2019/05/16/openstack/keystoneto-google-saml2.html